
 01 · TRACE BOTH ROOF LEVELSDo not inspect the upper downpipe in isolation. Follow its water across the receiving roof, into the lower gutter and down to the final discharge.AI-generated illustration · not a customer property or job
A downpipe ending above a porch, dormer or extension roof is not automatically a defect. Approved Document H allows a rainwater pipe to discharge onto another drained surface. The question is whether that complete stepped route is suitably arranged and able to carry the combined flow without repeatedly wetting the wall, damaging the roof covering or overwhelming the lower gutter.
For homeowners, landlords and facilities managers, the practical check starts at the upper outlet and finishes at the ground. If any link is restricted or poorly directed, the visible problem may appear much farther down than the original downpipe.
Understand the complete route first
Sketch the two roof levels from the ground. Mark the area feeding the upper gutter, the upper outlet and downpipe, the shoe or spreader over the lower roof, the direction of the lower roof slope, the receiving gutter, its outlet, the lower downpipe and the drain or gully at ground level.
This matters because the lower gutter is not collecting only the rain that lands directly on the extension. It may also be receiving water gathered from a larger upper roof. A small-looking lower roof can therefore have a busier outlet than its dimensions suggest.
Include roof valleys, dormers and any other downpipes that feed the same lower run. On a terrace or converted building, note whether the route crosses a boundary or appears to join a shared gutter. Do not assume ownership or responsibility from appearance alone; record the route and confirm arrangements before altering it.
Check the upper downpipe and shoe
The upper pipe should be securely clipped, its sockets should remain together and the lower shoe should direct water away from the wall. Approved Document H says a pipe discharging onto a lower roof or paved area should have a shoe to divert water away from the building.
Look for:
- a missing, cracked or displaced shoe;
- a shoe pointing back towards the wall or into an upstand;
- water staining below the final clip or pipe socket;
- a gap that allows the pipe to swing in wind;
- moss or silt immediately below the discharge; and
- a concentrated route that reaches a side junction rather than the lower eaves.
A sealant patch around the shoe does not correct a loose pipe, unsuitable direction or inadequate route. The fitting needs to be stable and positioned so the water reaches a surface designed to drain it.
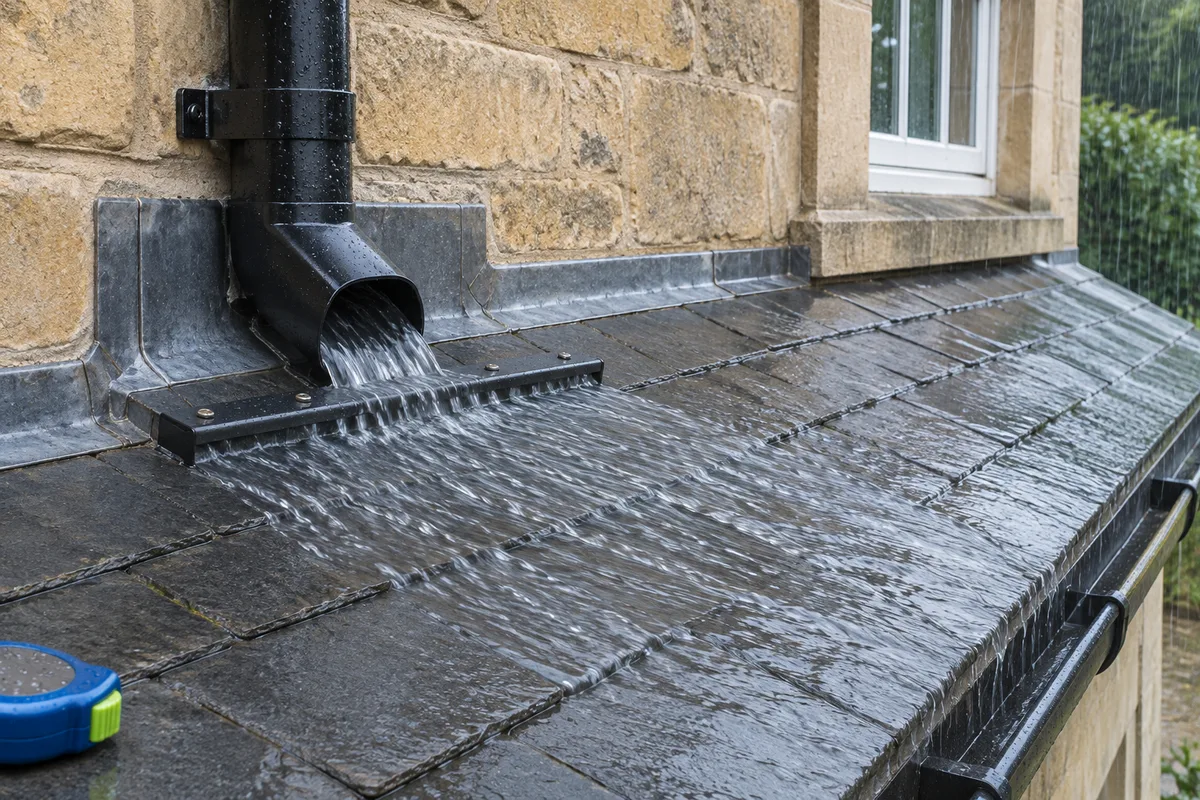 02 · AVOID ONE CONCENTRATED JETA suitable shoe or distributor can spread the upper-roof flow across the receiving roof instead of sending it down one narrow line.AI-generated illustration · not customer work
When is a distributor pipe relevant?
Approved Document H gives specific guidance for larger upper catchments: where a roof with an effective area greater than 25 square metres discharges through one downpipe onto a lower roof, a distributor pipe should be fitted to the shoe. Its purpose is to widen the flow reaching the receiving gutter so water is less likely to overtop it at one point.
That threshold is based on effective roof area, not simply the visible floor area below. Roof pitch contributes to the calculation, and several roof slopes or valleys may feed the same outlet. If the catchment or existing arrangement is uncertain, it is better to have it assessed than to estimate from a photograph.
A distributor is not a substitute for a clear lower gutter, adequate outlet or sound roof covering. It also needs to remain secure and free of debris. If a pipe has been cut short, altered during an extension or left to discharge as a narrow jet, the whole route should be reviewed.
Inspect the receiving roof surface
Follow the path from the shoe to the lower eaves. The tiles or slates should be sound and correctly laid, with side junctions and flashings intact. Repeated concentrated water may expose an existing weakness sooner, particularly where the discharge lands close to a lap, rooflight, wall abutment or damaged slate.
From a safe position, note:
- cracked, slipped or missing tiles or slates below the shoe;
- an obvious worn or permanently damp track;
- heavy moss or silt that holds water on the surface;
- water running sideways into a wall junction;
- loose leadwork or a failed abutment detail; and
- the discharge overshooting the lower gutter during rain.
Do not lift roof coverings or walk across the lower roof merely because it appears accessible. Conservatory roofs, rooflights, aged sheets and wet coverings can be fragile or slippery. Observation from the ground and planned access are safer.
The lower gutter has to handle combined flow
The receiving gutter is the point where the lower roof and upper roof flows meet. It needs a clear channel, sound supports, an outlet in the correct place and a downpipe able to continue the water away. A blockage near that outlet can make the upper shoe look like the cause even when the restriction is at the eaves.
Check for standing water, a local sag, loose brackets, leaking unions and debris concentrated beneath the upper discharge path. Observe ordinary rainfall if it is safe to do so. Water overtopping directly below the shoe may indicate concentrated inflow, but water rising along the whole run can point to a blocked outlet, restricted downpipe or insufficient capacity.
Historic England advises treating rainwater goods as a complete system and assessing capacity according to effective roof area and rainfall intensity. A complicated route or a lower gutter that is only just adequate may need redesign rather than repeated clearing.
 03 · FINISH AT THE FINAL GULLYThe lower gutter and downpipe are only useful if the final gully or drain connection can accept the combined flow.AI-generated architectural illustration · not a customer property
Do not stop the check at the lower downpipe
Trace the lower pipe to its final discharge. An open shoe should direct water into a visible gully, and the grille should be clear of leaves, silt and vegetation. A pipe that enters the ground directly should be recorded as a concealed connection; its condition cannot be confirmed simply by looking at the upper sections.
If water backs up around the gully, leaks from a low socket or emerges beside the wall, the issue may be below ground. Repeatedly clearing an already open gutter will not correct a restricted drain or failed soakaway. Keep gutter, downpipe and underground drainage findings separate so the right work can be arranged.
Warning signs that need more than cleaning
Cleaning removes debris, but it does not correct an unsuitable layout, damaged roof covering or undersized receiving gutter. Arrange a closer assessment where you see:
- water regularly striking or staining the wall below the upper shoe;
- a broken or unsupported shoe;
- slates or tiles damaged along the discharge path;
- water entering at a roof-to-wall junction;
- the lower gutter overtopping even when its outlet is clear;
- the lower downpipe or gully backing up; or
- an alteration that has left the upper pipe ending with no clear drainage route.
For listed or traditionally detailed buildings, changes to cast iron, lead or other historic rainwater goods may affect the building’s character. Record the existing arrangement and obtain suitable advice before replacing or rerouting it.
What a thorough cleaning visit should record
Ask for photographs that show the whole stepped route, not only a close view of one clean gutter. A useful record includes the upper outlet, the pipe and shoe, the receiving roof path, the lower gutter before and after cleaning, the lower outlet and the final ground discharge.
The report should distinguish between:
- debris removed during the clean;
- repairs needed to fittings or supports;
- roof-covering or flashing defects;
- capacity or layout concerns; and
- areas that could not be inspected safely.
This helps landlords and businesses plan follow-up work and gives homeowners a reliable baseline for the next period of heavy rain.
Plan access safely
The Health and Safety Executive says work at height should be properly planned, carried out by competent people with suitable equipment, and completed from the ground where reasonably practicable. It also warns against resting a ladder on plastic guttering or other weak upper surfaces.
A ground-operated inspection camera can often confirm the shoe, lower gutter and outlet. Where the roof surface or wall junction needs close inspection, the access method should be selected for the building rather than improvised from a window or small lower roof.
A practical inspection sequence
- Identify the upper catchment. Note every roof slope and valley feeding the upper outlet.
- Check the upper pipe. Look for loose clips, separated sockets and staining.
- Inspect the shoe or distributor. Confirm that water is directed away from the wall and across a drained surface.
- Follow the receiving roof. Record damaged coverings, moss and vulnerable junctions.
- Clear the lower gutter and outlet. Check supports, unions and standing water.
- Trace the lower downpipe. Finish at the gully, drain connection or water-storage system.
- Observe rain where possible. Record the exact point of any spill, backup or overshoot.
- Separate cleaning from repairs. Arrange roof, gutter or drainage work according to the actual defect.
Related guides explain how to assess roof area, outlets and gutter capacity, investigate water overshooting a gutter, distinguish a blocked downpipe from a blocked gully, and include extensions and conservatories in a gutter clean.
The practical rule
An upper downpipe may discharge onto a lower roof, but only as part of a complete drained route. Check the shoe, receiving roof, lower gutter, outlet, downpipe and final gully together—and investigate repeated overflow after debris has been ruled out.
Sources and further guidance
- GOV.UK: Drainage and waste disposal — Approved Document H
- Historic England: upgrades or alterations to rainwater goods
- Historic England: inspection, maintenance and repair of rainwater systems
- Health and Safety Executive: working at height safely
Share this guide
Know someone with an upper downpipe feeding a porch, extension or lower roof? Share this inspection guide.
Share on FacebookShare on WhatsApp